Sunday, November 24, 2013

Lovely As a Tree, Thank you, Card set

One of my favorite stamps sets!
Lovely As A Tree (127793) $19.95
 
This set is always sure to make beautiful masculine cards.
These will go in a gift basket for a few men,
who go out of thier way to lend a helping hand, at work.


Monday, October 21, 2013

Candy Corn Treat box


I went to a Scrapbooking Retreat last weekend.
I had a great time with my daughter and friends.
They are all such a lovely group of ladies.
And I cherish each years Retreat with them.
 
My "Table Mate" and Friend, Vanessa, worked most of Saturday night on the cutest treat boxes.
She worked and worked, and I wondered if she would have time to finish.
I have no idea how late she stayed up working.
But when the rest of us got up the next morning
this is what we saw sitting at our tables..........
 
 
This is just the cutest treat holder I've seen!
She used the Petal Cone Bigs L Die, from Stampin' Up!
You can find it now in the clearance rack on line.
 
Thank you Vanessa for all the work you did to make these, and sharing them with us!
Hope Everyone has a Happy and Safe Halloween!!!


Monday, October 7, 2013

Oct 24th Card Class

October 24th Card Class!
In my home at 6:00 pm
3 cards and 1 Framed gift, for $8.00 or place a $15.00 order and make all FREE!
Bring your own scissors and adhesive.
RSVP by Oct. 21st.


Monday, August 26, 2013

Su Birthday Candles


I add a card to every order as a "Thank you for your order".
Today I created this card for my Favorite cutomers.
I used Stampin Ups Birthday Candles Jumbo Wheel stamp (130111) $8.50
I removed the rubber from the wheel and placed the rubber on
Stampin Ups Clear-Mount Cling Foam (124236) $10.95


I cut out the candles for use as a single stamp.
This foam is awesome. It has transformed my old wood stamps into cling stamps,
to use on clear blocks.
 
 I created this card with my new Birthday Candles single stamp.


Happy Stamping!!!


Sunday, July 21, 2013

SU, Love & Laughter

As always, when it comes to invitations, I make them!
And this invitation is for my daughters Bridal Shower.
 
I used Stampin Ups! Love & Laughter stamp set (125477) to create
something for her shower.


Happy Stamping!


Thankful Tablescape Kit From Stampin Up!

I Love the new kit in the "Holiday Happiness Catalog"
I used the Thankful Tablescape Simply Created Kit 133463
I wanted to create the beautiful wraped candle found on page 2 in the catalog.
I felt the candle need something alittle extra, so I also used the
Magnificent Maple stamp 131868, to add a little something extra.
 
 
Because the candle used was only 4 inches tall I was also able to
decorate this painted can and use both as a gift.
 
 
Happy Stamping!


Wednesday, May 8, 2013

Swallowtail, Butterfly card

That great big Butterfly is awesome!!!
 
I love using Stampin Ups! "Swallowtail" stamp (129216) 
to create a beautiful card.
 
Here he is
heat embossed with white and in color sponged across him.
I cut him out to make him pop off the card.
He makes a beautiful focal point on this card.
 
And here he is stamped as a background.
Again, embossed and sponged with one color.
He makes a spectacular background as well.
 
What will you do with your Swallowtail stamp?
 
Happy Stamping!


Smash Book, from recycled Cereal Boxes.

Smash books have become popular over the last year or so.
I see them as a diary/scrapbook/planner all smashed into one.
Its just another way to scrap our memories.
 
You can buy these books in stores, but Nothing is more special than one you create yourself.
I have seen books made using all kinds of recycled materials.
Cereal boxes seem to be in abundance in my home.
So naturally I would make my Smash book using the boxes.
 
Cut up the cereal boxes to the size you want your book.
I choose 5x7 inches.
I cut 6 pieces of cereal card boards, but you can cut however many you want your book to be.
I then cut Scrapbook papers 5x7, Mod-Podged them to the card boards, front and back.
Punched holes where I wanted my rings to go.
Then decorated as desired.
 
And waa-laa!
My Smash Book!
 
Front
 
I added pockets in mine.
 
Envelopes are even cute to add.
 
Don't forget the ribbons and trinkets!!!
 
I made two books. One to keep and one to give away at class....
What a fun way to share.....
 
Don't Forget to sign up for classes.
 
Happy Stamping!


Sunday, March 17, 2013

Flower Cards, Framelits

 
I did a few cards today to show a great use of the Positive and Negative, when using Framelits.
I used Stampin Up's Floral Frames Framelits (127012)
To make these fabulous cards.


Two cards from one set of die cuts!
 
Happy stamping!


St. Patricks Day Card

Here is my St. Patricks Day Card!
 
using the Heart Die's and Glimmer Paper from Stampin Up!
I love the purple and Green together.
 
 
Happy St. Patricks Day!


Tuesday, March 5, 2013

Su, Thinking of You, 3D Flower Card, Pop up

I have been serching for this card for a long time.
I finally found instructions on how to make this card.
At least one I can understand.
Usually the instructions are in a foreign language.
But this video didn't need words.
Perfect for me.
 
This is my First attempt at the 3D flower Pop up card.
I love it. And I hope to do a card like this for my classes.
I think my friends will love this card too.
 
 
Here is the You Tube video I watched to make this card:
 
 
This person did a fantastic job making the video easy to understand and follow.
Good Luck to you!
If you take my classes, we will be making it soon!!!!!
 
Happy Stamping!

SU, Thinking of You

Snow Snow Snow.
I'm ready for spring, however it is snowing like crazy right now.
Nothing to do but sit and stamp.
Not that I'm sad about that!
 
Here I have used Stampin Up's "Thinking of You' Single stamp.
 
I love the layering ability of this single stamp.
 
Just to darn fun!
 
Happy Stamping!


SU, Fabulous Florets Wedding Card

Here is a recent wedding card, made for a Friend of mine.
The wedding colors are Red and black.
Using a Z fold and,
Stampin Up's Fabulous Florets stamp set, I embossed and cut out the flowers.
I think the card has an elegant look.
I'm happy with the result.
 
 
Happy Stamping!


Saturday, March 2, 2013

SU Ears To You, Easter Cards

Having fun Playing with the New and older stamp sets.
Its another Saturday afternoon and I'm preping for more classes.
 
I am loving these cute little bunnies from,
Stampin' Up!s Ears To You stamp.
 
I'm Thinking Easter!
 
And the perfect gift box to go with this card.........
Found him on Pinterest!
 
Stampin' Up!s Everything Eleanor is not a new set, but it sure is a beauty!
I love this set for fun Girly Cards. Pinks and tans are lookin good here.
 
Item number 124164 Clear $26.95


And my last creation for today was inspired, again, by a card from pinterest.
The yellow makes me think Spring!
Bordering on Romance stamp set from Stampin' Up!
 
Item number 125482 Clear $21.95
 
 
I'm looking forward to warmer weather and sunny days!
Happy Stamping!


Sunday, February 24, 2013

Explosion Boxes, My Way!

I have seen alot of instructions and videos on how to make explosion boxes.
They just seemed to be too much work.
I needed a way to make them easier and faster.
I saw a picture of an explosion box that looked pretty simple.
I couldn't find instructions for it so I created my own.
I am probably way off compared to the original , however, mine work and look just as nice.


I can't wait to have a class on this!
 
Directions:
 
I'm using white paper and markings for instruction use only!
 
Box Base: 12x12 inch paper,
Using Simply Scored Scoring Tool (122334)
Score at 4 and 8 inches.
 
Turn paper quarter turn, and score again at 4 and 8 inches.
 
Using Simply Scored Diagonal Plate (125586)
Score each of the corners, from outside corners to 4 inch score line.
 
Cut each corner from 8 inch score line to 4 inch score line.
 
 
Fold on all score lines.
Base should look like this.
 
Box Top Directions:
7 1/2 x 7 1/2 inch square
Score at 3/4 , 1 5/8 , 5 7/8 , 6 3/4 inches.
 
Turn paper quarter turn and score again at
3/4 , 1 5/8, 5 7/8 , 6 3/4 inches.
 
Cut Black lines shown. Cut away all X pieces.
 
Fold all score lines
 
Use tape on Tabs and Flaps that fold over the Tabs.
Box top Complete.
 
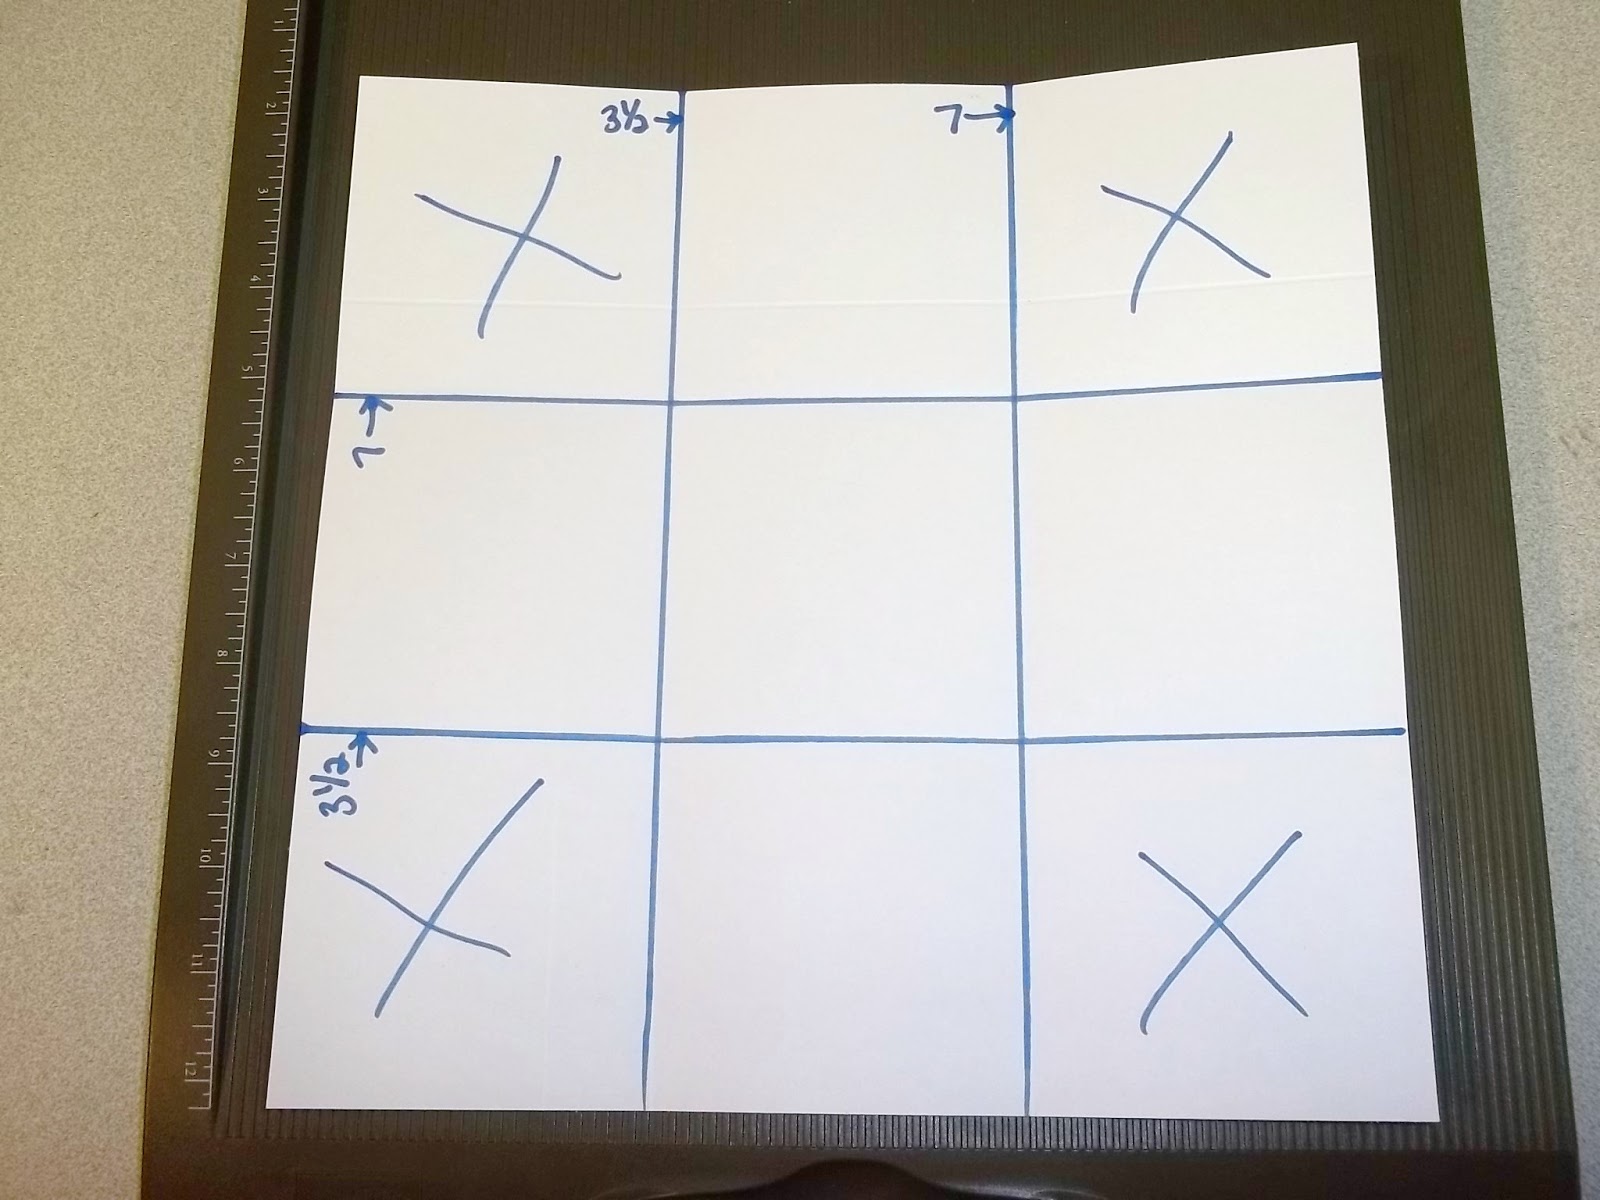
Inside, Extra Flaps ( if desired)
10 1/2 x 10 1/2 inch square.
Scored at 3 1/2 and 7 inches. Turn paper quarter turn and score at 3 1/2 and 7 inches.
 
Cut away each of the corner squares and fold on all score lines.
 
Tape to Inside, Bottom of box.
 
Decorate at desired!
This one was given as a gift.
 
 
Happy Stamping!


Halloween in February?

NO.... Not really! I went to a scrapbooking retreat last fall, and one of the Ladies (who's name I can not remember) Made these cute cards for everyone. I just came across it again, and wanted to share. She used the Stampin Up Top Note Die cut and verious sizes of circle punches to create this card. Yes... That is a pocket on the inside. What a great idea for a gift card. Happy Stamping!!!

Monday, February 18, 2013

Explosion Box

Did some reorganizing in my scraproom. And it never fails, that I find retired papers that must be used. And so, I've been creating again, using retired papers, scraps and whatever else I can find. I honestly can't remember where I saw a picture of and explosion box, made this way. Pintereset, Splitcoast, Stampin connection? I don't know. I just remember looking at the picture for a while and thinking.... I can do this...Easy! So here is my super easy Explosion Box. Happy Stamping!

Thursday, January 31, 2013

More Pinterest CAS Cards

Is anyone else finding it hard to pull youself away from Pinterest? I am ADDICTED! Everything I Repin, I intend to make at some point in time. Here are three more cards I Cas'd from Pinterest.
I CAS'd this card from: Glenda Calkins, Stampin Connection.
I CAS'd this card from: www.splitcoaststampers.com/gallery/member.php?uid=78298
I CAS'd This card from: www.wickedlywonderfulcreations.blogspot.com As I tend to do, I have changed each of the cards, a little,my way. But the basic colors and general ideas are the same. Thank you to these wonderful ladies for sharing thier ideas with the world. And Thank You to all Pinterest Pinners for sharing! May Everyone continue to Copy And Share! Happy Stamping!