Showing posts with label Stampin Up. Show all posts

Sunday, September 8, 2019

Fall Thank you

I have the best work staff. They help make our work a good place to be. They are great listeners, mostly because I never stop talking. They often keep me laughing. They always remind me what I need to be doing, as I am often sidetracked. Most of all, they are amazing ladies.

The ladies helped me celebrate my birthday with special treats and gifts.
So to thank them for being so kind, I created these gift boxes. These sure turned out cute.
It was so nice to get into my room and create. Its been a while since I've had time to spend creating fun stuff. I've missed it.


Here is a link to the box instructions I used. 

Please know that I no longer sell Stampin Up products, or have classes.
But I am still using their products. However some of the products are out dated.

Products used today:
Paper: SU Lost Lagoon, Very Vanilla, and paper scraps from a paper pack that hase been retired for years, and I can't remember its name. But they are all fall colors with leafs on them.
Stamps: SU Vintage Leaves, SU Express Yourself, and a homemade tree stump stamp, I made myself.
Embossing folder: From SU
Dies: SU Leaflits and Deco Labels
Ink: SU Early Espresso, Lost Lagoon, More Mustard, Crumb Cake, and Cajun Craze.

If you have none or some of these products, you can get creative and substitute with other products.
That's what I love about creating.
Happy Stamping!!!

Tuesday, January 17, 2017

Paper Napkin Transfer Card


I have always wanted to try the Napkin transfer technique.
I had an extra day off from school today, and I was given a package of paper napkins.
So it seemed like a good time to try the transfer.
This technique is a great way to get a cool 
back ground on your card or scrapbook page, without spending any money.

Supplies needed are:
Printed paper napkin
Scissors
ironing board or towel
Iron
 (I started with my mini Iron, but decided I needed my full size iron)
 two sheets of unprinted paper
plastic wrap, brand doesn't matter.
Card stock, cut to size you need

My card stock was cut at 4 x 5 1/4 inches.
Just to enough to fit the front of an A2 card.


After you have all your supplies, take one napkin and peel away all the layers.
There are 3 layers to the decorated paper napkins.
You want the printed piece only.


Next, Layer all pieces as shown below:
Towel/iron board
Sheet of unprinted paper
Your precut card stock
one sheet of plastic wrap to cover your precut card stock
Situate your napkin over plastic wrap
Then lay down another piece of unprinted paper
Everything should be sandwiched, nice and neat.


Start ironing on the top, unprinted sheet.
I ironed for about 30 seconds, then started lifting layers to see if the napkin is sticking to the card stock. I kept ironing in places that were not sticking well.


Once I was sure the napkin was sticking to the card stock, I started peeling everything apart.
This is a little messy. Be careful not to peel the napkin from the card stock.


Trim the napkin around the card stock.


And its ready to use.
It has a nice soft feel to it. Like fabric.
And the possibilities are as endless as there are Napkins!!!


Also on this card I used Stampin Up's 
Falling Flowers and Rose Wonder stamp sets
and, Rose Garden and May Flowers Framelits Dies.

Note: Be careful not to melt the plastic wrap to your iron. ;)

Happy Stamping!!!


Monday, January 2, 2017

Flourishing Phrases, Birthday card


Today, I created Birthday card.
Trying to use up the tons of paper and products I have collected over the years.

Today, I used paper that I got, from who knows where, but I know its pretty old.
These papers have been in my stash for years.
Today was their lucky day!
I used Stampin Up's Flourishing Phrases to create this card.
As well as the Flourish Thinlits
And this is what I came up with.....

Front:

Inside:


Folded, showing the inside:


Directions for the Folded card:
To create the folded card, I used a 12x12 piece of card stock. 
I used the score board and scored it at 6 inches.


Then turn the paper and score again at 6 inches.
This should have created a scored cross, plus sign or X across your paper.
Whatever you want to call the score lines.


Using scissors, cut on one scored line, just to the center, where the scored lines cross.


Put the diagonal plate into the score board and score a diagonal line toward the center.


Fold the card stock with the diagonal line, folded toward the inside.


Add tape to one side.


Fold card, and fold the taped side over last.


Your card should look like this.


Now have fun  and decorate!!!!!
Happy Stamping!


Friday, December 30, 2016

Flourishing Phrases, note cards

What do you do with a box of note cards, that was given to you?
Well, dress them up, of course!

I used Stampin Up's Flourishing Phrases stamp set and Flourish Thinlits for this card set. Ink colors, Melon Mambo and Pumpkin pie. Paper, Night of navy, Very Vanilla, and Gold Glimmer. Navy twine.

I was in desperate need of thank you cards, after the holiday. I'm also on a mission to use products I already have, to make room for new.

Happy Stamping!
And Happy New Year!

Monday, December 26, 2016

Bright & Beautiful Christmas card

Its been a while since I've posted.
I wanted to let everyone know, that even though I am no longer a Demonstrator, I am still going to make cards and share.
I will no doubt be using older stamp sets, since I have an extensive collection of stamps.
But the ideas and creations will continue to come.
I was a little late sending cards this year, but I did manage to get some out.

I miss making cards. But mostly I have missed making cards with friends.


I hope everyone had a safe and Happy Christmas!

Today's post is my 2016 Christmas card.


On this Z folded card, I used Bright and Beautiful, Ornamental Pine, and Petite Pairs, Stampin Up Sets.
The striped paper is from Hobby Lobby. 
The green paper, was also folded in The Z fold style, placed on the card in the opposite position. 
This fun fold seems to be all over right now, so I decided to try it.
There are lots of pop up, 3D options you can create using this fun fold style.

Dear Friends, (you know who you are) I am missing you, and I miss class with you.
I have been thinking of each of you, and wishing all of  you well.
Take care, and I hope to see you again sometime.
I'm still available if you need help with creative ideas!
Happy Stamping!!!!


Sunday, June 19, 2016

Touches of Texture, Stampin Up

I am so addicted to my paper and stamping.

I needed a card for my Niece. Who is attending UW Oshkosh for a conference this week.
I was finally able to sit down at about 10:00 pm.
Usually, I'm sleeping by 10 pm.
Well, time got away from me, and by the time I finished the card, it was 1:30 am.
What???
How in the world did I manage to lose that much time, and not realize how late it was?
Simple......
I'm an addict to all things Paper!

I wanted to break out the new stamp set  "Touches Of Texture".
I love the stamp set, and the background textures it offers.
This set reminds me of the wild flowers we see when driving the Rustic Roads in Wisconsin.
Which are all in bloom now.


Top view to show the pop ups.


Enjoy the warm weather and sunshine!
Happy Stamping!

Stampin Up products used:
Stamp sets used: Touches of Texture, You've got This
Card stock: Whisper white, Wisteria Wonder, Blackberry Bliss
Ink used: Staz On Jet Black, Hello Honey, Regal Rose, Wisteria Wonder,
 Lucky Limeade, Blackberry Bliss.
Other : Wink Of Stella, Decorative Label punch, Project Life Corner Rouder


Thursday, June 16, 2016

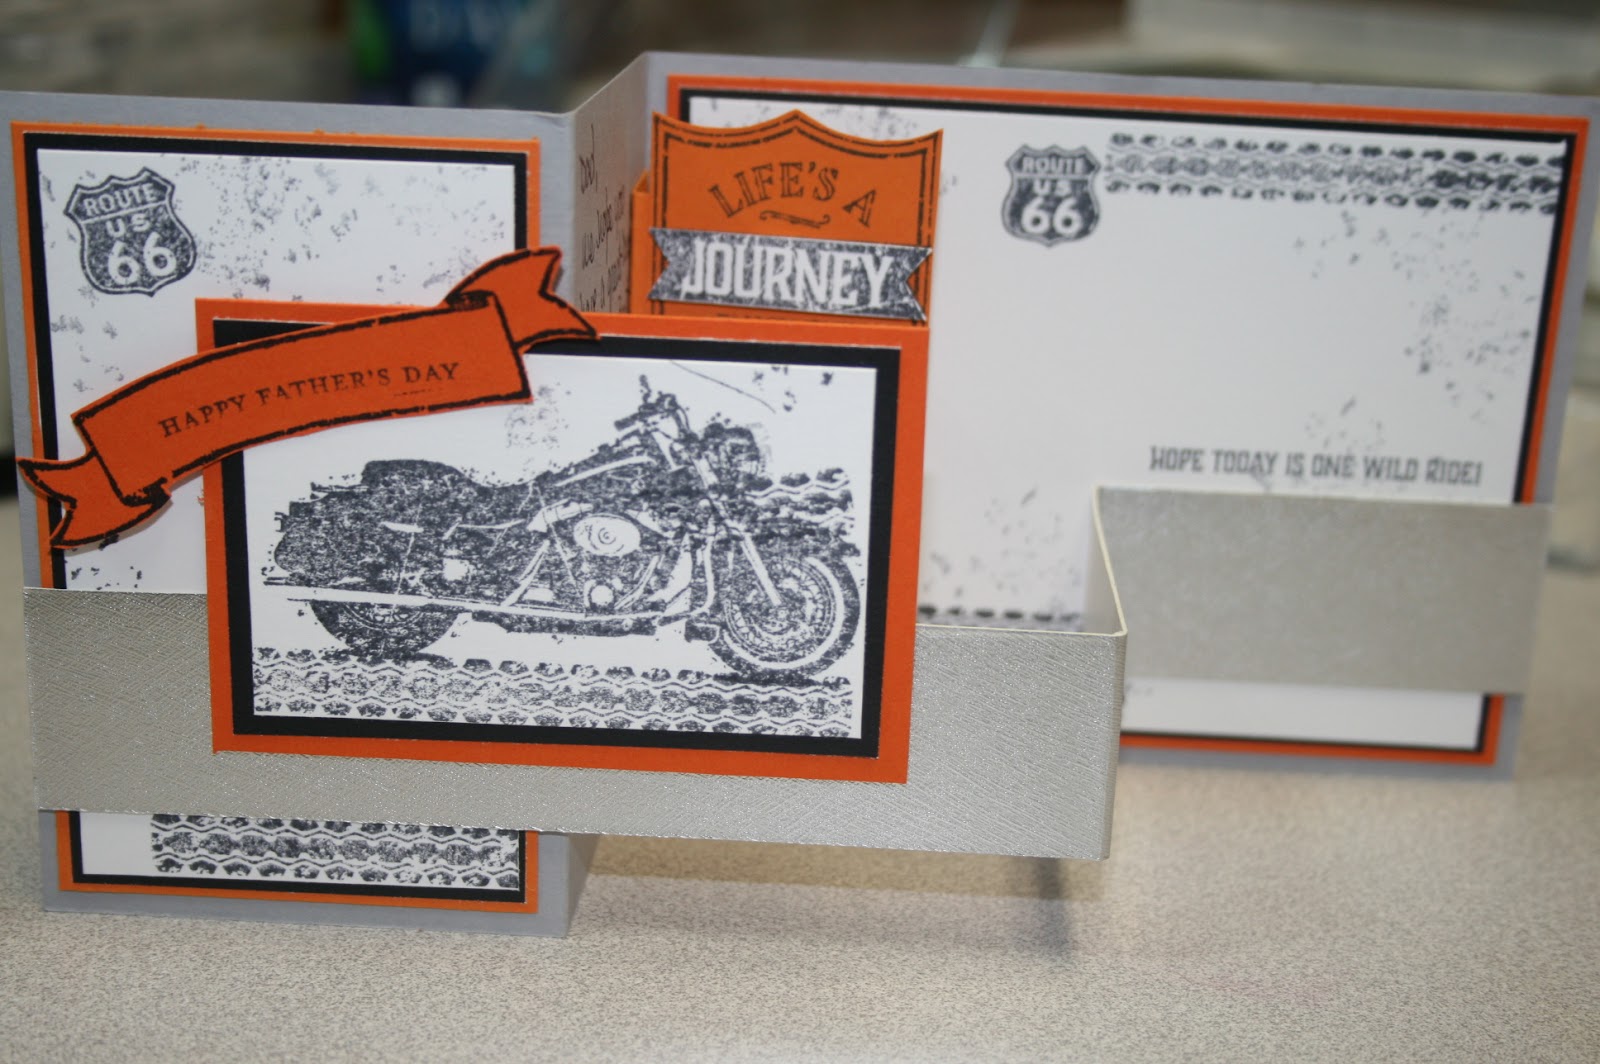
Father's Day, My Biker Dad!

Father's Day is this weekend.
As always, I'm a little late with my creation.
Dad, Don't Look till it comes in the Mail!!!!!

Everyone thinks they have the best Dad in the world.
My Dad really is the Best Dad in the World.
I Love you, Dad!

I wanted to create just the right card for him.
 I found the perfect stamp set in the new catalog.
ONE WILD RIDE
I waited, and waited for my Stampin Up order to come,
 so I could use this stamp set to make an awesome card, for an Awesome Dad.
Then I got it.
And guess what?
I had a brain block. 
I couldn't figure out how I wanted to use this stamp.
 I only knew, this was the perfect stamp to use for my Dad.

My Awesome Dad!

What to do, what to do ?????
 I went on Pinterest for ideas. 
Thank you to Stampyourartout.com , I found an idea.
Although I've seen this form of pop up card before, I've not tried it.
I liked her idea for the card, so from there I created a similar card.
 I love the extra pop up inside.

Here is My take on her original idea.....
(no peeking Dad)

Lighting wasn't that great, so I tried again.


A top view shows how I did the pop ups in my card.


I had fun making this card. I like the fold style, and I'll have to create more cards with this fold.

Happy Father's Day to all Dads!
Thank you to ALL who inspire me, and I hope to inspire others.
Happy Stamping!!!!

Stampin Up Products used:
Card stock: Basic Black, Whisper White, Pumpkin Pie, Silver foil, Smoky Slate
Ink: Basic Gray
Stamp sets: One Wild Ride, Teeny Tiny Wishes


Monday, June 13, 2016

Remarkable You Card

Hello Again!
Its been a long time.
Life has a funny way of keeping me busy.
I had some time to make a few cards. I made some cards for friends, that I can't wait to share.
Easy cards, however time consuming. It was relaxing to sit in my room, stamp, paint and create.
Here is what I came up with:


I was browsing Pinterest and found a pretty card to CASE.
However, I didn't have all the products needed to create the same card.
So using the idea, I swapped out stamps, keeping the same color theme.
Some of the products used on this card, are retired, but any of the new ribbons would replace what I've used, beautifully.
Happy Stamping!

Stampin Up Product list -
Cardstock: Crumb cake, Whisper White, Crisp Cantaloupe
Inks: Jet Black Staz On, Lucky Limeade, Crisp Cantaloupe, Calypso Coral, Crumb Cake
Stamp sets: Remarkable You, Timeless Textures, Hardwood, Honeycomb Hello
Other: Calypso Coral ribbon, Hexagon Thinlits Die, Aqua Painters

Saturday, March 14, 2015

Butterfly Thinlits Dies, Pop up card

This die set is amazing.
Easy to work with, and makes beautiful cards.
Unfortunately, as we speak this die set is unavalable. 
No word as to when it will come back or if it will.
So this post is only a show and tell for those who already have the
Butterfly Die set from Stampin up.

I saw a card on Pinterest, with this set as a pop up butterfly.
However there were no directions.
I understand the simple mechanics of pop ups and had to give the card a try.
Here it is. My version.....


I plan to post directions as soon as I have the time to create photos and instuctions to go with the photos. 
This butterfly die, makes a beautiful pop up card!
Happy Stamping


Friday, August 15, 2014

Swallowtail and Field Flowers!

 I wanted to share the Beautiful cards my friend made for me.
 
Here she used Stampin Up's Swallowtail stamp.
One of my favorite stamps.
 
 
The colors are my favorite and she did a fantastic job on this card.
 
And just a few minutes ago, I checked my mail, And look what she sent me.......


OMG..... I love it!!!
Another beautiful card.
She used Stampin Up's Field Flowers stamp set on this card.
 
Patti, Thank you for the Cards!
I love them and will enjoy sharing them.
Thank you!
 
Happy Stamping!


Tuesday, August 12, 2014

2014 Mini Catalog, Ornamental Pine

I am playing with the new stamp sets from the
New 2014 Stampin Up, Holiday Mini Catalog.
Ornamental Pine, (135107)
 Is a great stamp set to get the Holidays rolling.
 
As well, the Trim The Tree DSP Paper stack.
The perfect coordinating Holiday paper.
 
I can't wait to share this card in class!


Another fun Stamp set....
Mingle All The Way (135773)
And the Beautiful, 12 x12 DSP All Is Calm.

 
Contact me August 28, 2014 - January 5, 2015
to order these products.
Or come to one of my classes listed in Events!
Happy Stamping!


Sunday, August 3, 2014

Blended Bloom, Mini Scrapbook

I'm kind of on a Mini Scrapbook thing, right now.
Making mini scrapbooks are great gifts for the special people in your life.
They appreciate the work you put into it and the photos of family and friends you've added.
You can't go wrong with mini scrapbooks!
 
I used old Designer Series paper, to decorate this book.
Since I'm a paper hoarder, it was a good thing to use the last of this paper on the book.
 
I also used the Blended Bloom, Stampin Up, set (135906)
And the New Stampin Blendabilities work perfect with this stamp set.
 
This 6 x 6 Mini Scrapbook is the easiest to make.
 
Take one 12 x 12 card stock, and score at 6 inches.
Turn  1/4 turn and score at 6 inches again.
Cut on score line, from the bottom, up to the center.
Fold all score lines, And decorate at desired.
 
Seriously, you can't get any easier than that!
Here is my finished Mini Book.
 

Front
 

Inside, flaps folded up
 

Inside, flaps down
 
Happy Stamping!


Truly Greatful, Mini File Folder Scrapbook

I can't wait to teach my Stamping Friends, how to create a Mini Scrapbook.
These are so darn cute and easy to make.
 
I used the Truly Greatful, Stampin Up set. (131733)
And a retired DSP.
I love any idea that alows me to use up old Designer Series papers.
Christmas is just around the corner and this is a beautiful gift giving idea.
 
Front Cover.


Inside.


Opened to inside, with two flaps open at bottom and two pockets at top.
Just needs photos!
 
 
Mini Manilla File Folder Scrapbook Instructions
 
  1.  Cut off tabs on both sides of folder.  ½ inch.
  2. With center fold at top of cutting board, cut folder at 11 1/2 inches.
  3.   Using a score board, turn center fold towards the left of scoreboard, score at 5 ¾ inches.
  4. Turn folder, with center fold towards the top of score board, score at 5 ¾
  5. Open folder. Cut away bottom, side rectangles.
  6.  Starting from center score line on bottom, Cut up the center score line, to the crossing score line.
  7. Fold short flaps at top side in towards the center score line. These will be pockets.
  8.  Fold the 2 larger, bottom flaps, up.
  9.  Cover everything with designer papers, stamp and decorate!


Tuesday, July 15, 2014

Kinda Eclectic

I am in Love with this new stamp set.
Kinda Eclectic 135350
Its a little grunge and a whole lot of pretty!!!
 
I created a fun set of freebies for the last class.
Thats right! I said FREEBIES!
 
 
When you come to my classes, I have a little gift for each person,
and a drawing for something fun.
 
So be sure to sign up and don't miss out!
Happy Stamping


Sunday, May 11, 2014

Save The Rubber!!!

Are you saving the left over Rubber from your stamp sets?
 
Well, you should... It is reusable.
I saved the rubber from a few of my sets. I don't save all of it, but some.
usually the sets that have alot of extra rubber are the best.
 
I wanted to reuse the rubber to create my own stamp set.
I have seen ideas about running the scraps of rubber through your bigshot on a die cut,
and creating shapes. That is a great way to reuse some of the rubber.
I've done this and it works wonderfully.
Here is a picture of those shapes I used with my die cuts.
 

Not too bad!
 
But the extra rubber around your new stampsets can also be used to create
some pretty awesome handmade stamps.
I loved the movie The Lorax.
And so I decided to create a stampset.
Here I created the Truffula Trees stamps.
 
 
Oh My Gosh.... Awesome!
To create the Lorax, I needed to buy the Undefined Stamp Carving Kit from Stampin Up.
 
I used the kit to create the Lorax.

Yes, I carved the rubber, using the tools from the kit.
So Cool and Easy!
 
And Wa-La....
My card
 
I had lots of fun creating the stamp set.
I can now share some cute cards and
scrapbook pages with the kiddos in my family!
 
Happy Stamping and Creating!


Tuesday, April 15, 2014

Morning Meadow Card

I love purple!
But for some reason I rarely use it for cards and scraping.
So today I made it my goal to create a purple card.
Using Elegant Eggplant (105126)
Rich Razzleberry (115316) I'm not sure if this is a purple, but it worked for me.
Naturals Ivory (101849), Crumb Cake(120953)
Morning Meadows Hostess Stamp set (129678)
and Gorgeous Grunge stamp set (130517)
I created this card for May's Class.....
 
 
Contact me to find out how to earn the Hostess Stamp set.
 
Can't wait to share it with my Stamping Friends.
Happy Stamping!